Setting up your own Maven repository and uploading artifacts to it is quite a daunting task. As I went through this experience myself recently, I want to help others in setting up their own Maven repository via Artifactory and automate uploading artifacts using Gradle.
In less than 30 minutes you will have a fully operational private Maven repository and have configured your Gradle buildscripts to upload your Android library artifacts.
Note that the material presented here can quite easily be extended to be applicable in a broader scope beyond Android.
Setting up a Repository Manager#
First of all we need to make sure we have an actual Maven repository to upload our artifacts to. According to Maven you should use a repository manager to do that:
Best Practice - Using a Repository Manager
A repository manager is a dedicated server application designed to manage repositories of binary components. The usage of a repository manager is considered an essential best practice for any significant usage of Maven.
Why Artifactory?#
While there are some options available to choose from, I personally selected Artifactory because:
- Clear and attractive UI
- Super fast configuration
- Gradle plugin
- User access control
- Free and open source
For more information have a look at the alternatives, checkout this feature comparison matrix or review all of the Artifactory features.
Verify you have Java SDK 8#
Before you get started, make sure that you have Java SDK 8 installed, or otherwise Artifactory won’t start. You can easily verify your Java version with java -version:
$ java -version
java version "1.8.0_51"
Java(TM) SE Runtime Environment (build 1.8.0_51-b16)
Java HotSpot(TM) 64-Bit Server VM (build 25.51-b03, mixed mode)
If it doesn’t output at least version 1.8.x, you should download and install a new Java SDK before you continue.
Note that the error you get if you don’t have Java 8 looks a bit cryptic:
Aug 05, 2015 9:29:31 AM org.apache.catalina.core.StandardContext startInternal
SEVERE: One or more listeners failed to start. Full details will be found in the appropriate container log file
Install Artifactory#
Thankfully this is incredibly easy to do. Just download the latest version of Artifactory, unpack the archive and run the artifactory executable for your platform.
You can easily verify your installation and start experimenting with its features by navigating to http://localhost:8081/artifactory/. For now, don’t worry about all of the settings, we will configure what we need later on.
Configuring Gradle to upload Android artifacts#
Let’s upload a very simple archive by configuring a new Gradle task for our Android library project.
In your top level build.gradle file, add a reference to the repository of the Artifactory Gradle plugin:
buildscript {
    dependencies {
        classpath "org.jfrog.buildinfo:build-info-extractor-gradle:3.1.1"
    }
}
Next in your library we will need to apply two new plugins: one to prepare the Maven artifacts maven-publish and one to upload the archives to Artifactory com.jfrog.artifactory:
apply plugin: 'com.jfrog.artifactory'
apply plugin: 'maven-publish'
Every Maven artifact is identified by three different parameters:
- artifactId: the name of your library
- groupId: usually the package name of your library
- version: identifies different releases of the same artifact
For the last two, we will explicitly define a variable in the build.gradle file.
def packageName = 'com.jeroenmols.awesomelibrary'
def libraryVersion = '1.0.0'
The artifactId however needs to match the output filename of the assembleRelease task. Therefore we either have to rename the library module or explicitly specify the output filename. I personally prefer the first approach, which allows to get artifactId in the following way:
project.getName() // the ArtifactId
Now we need to configure the maven-publish plugin so that it knows which artifacts to publish to Artifactory. For our purpose we will refer to the ***-release.aar file, generated by the assembleRelease task. Note that we can predict the name by taking the name of the Library project:
publishing {
    publications {
        aar(MavenPublication) {
            groupId packageName
            version = libraryVersion
            artifactId project.getName()

            // Tell maven to prepare the generated "*.aar" file for publishing
            artifact("$buildDir/outputs/aar/${project.getName()}-release.aar")
      }
    }
}
Finally we need to configure the com.jfrog.artifactory plugin so it knows which repository to publish the artifacts to. For simplicity we will upload the artifact to the locally running Artifactory instance (http://localhost:8081/artifactory) and place it in the default libs-release-local repository. Note that the username admin and password password are hardcoded in this example, but we will provide a better solution for that later.
artifactory {
    contextUrl = 'http://localhost:8081/artifactory'
    publish {
        repository {
            // The Artifactory repository key to publish to
            repoKey = 'libs-release-local'

            username = "admin"
            password = "password"
        }
        defaults {
            // Tell the Artifactory Plugin which artifacts should be published to Artifactory.
            publications('aar')
            publishArtifacts = true

            // Properties to be attached to the published artifacts.
            properties = ['qa.level': 'basic', 'dev.team': 'core']
            // Publish generated POM files to Artifactory (true by default)
            publishPom = true
        }
    }
}
Deploying artifacts#
Now that our Gradle buildscripts are properly configured we can easily publish artifacts to Artifactory by running the following command:
gradle assembleRelease artifactoryPublish
Notice how we first invoke assembleRelease before we invoke the actual artifactoryPublish task, because of the way we defined the artifacts to publish in the previous section.
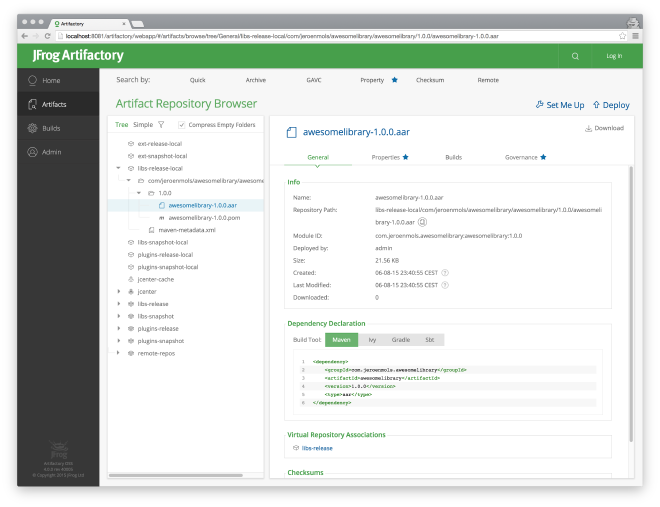
You can very easily verify that the upload was successful by navigating to localhost:8081 and signing in with the default admin credentials.
Using the artifacts#
To make use of the published artifacts in another project we have to add our Artifactory repository to the list of Maven repositories in your top level build.gradle file:
allprojects {
    repositories {
        maven { url "http://localhost:8081/artifactory/libs-release-local" }
    }
}
After we can simply add the artifact as a dependency in the build.gradle file of our main project:
dependencies {
    compile 'com.jeroenmols.awesomelibrary:1.0.0'
}
Wrap-up#
Congratulations! You now have a fully working Maven repository manager with a Gradle script to generate and upload your artifacts.
In the next [blog post]({{ site.baseurl }}{% link blog/_posts/2015-08-13-artifactory2.md %}) I will zoom in on more advanced topics like:
- Library projects with dependencies
- Configuring your own repositories
- User access management and rights
- Removing hardcoded username and password from
build.gradle
I have also uploaded a complete example on GitHub for your reference.