For years Android developers have been limited to Java 6 features. While RetroLambda or the experimental Jack toolchain would help, proper support from Google was notably missing.
Finally, Android Studio 3.0 brings (backported!) support for most Java 8 features. Continue reading to learn how those work and why you should upgrade.
Enabling java 8 features#
While Android Studio already supported many features in the Jack toolchain, starting from Android Studio 3.0 they are supported in the default toolchain.
First of all, make sure you disable Jack by removing the following from your main build.gradle:
android {
  ...
  defaultConfig {
    ...
    // Remove the jackOptions if they exist
    jackOptions {
      enabled true
    }
  }
}
And add the following configuration instead:
android {
  ...
  compileOptions {
    sourceCompatibility JavaVersion.VERSION_1_8
    targetCompatibility JavaVersion.VERSION_1_8
  }
}
Also make sure you have the latest Gradle plugin in your root build.gradle file:
buildscript {
  ...
  dependencies {
    classpath 'com.android.tools.build:gradle:3.0.0-alpha7'
  }
}
Congratulations, you can now use most Java 8 features on all API levels!
Note: In case you’re migrating from RetroLambda, the official documentation has a more extensive migration guide.
Lambda’s#
Passing a listener to another class in Java 6 is quite verbose. A typical case would be where you add an OnClickListener to a View:
button.setOnClickListener(new View.OnClickListener() {
    @Override
    public void onClick(View view) {
        doSomething();
    }
});
Lambda’s can dramatically simplify this to the following:
button.setOnClickListener(view -> doSomething());
Notice that almost all boilerplate is removed: no access modifier, no return type and no method name!
Now how do lambda’s actually work?
They are syntactic sugar that reduce the need for anonymous class creation whenever you have an interface with exactly one method. We call such interfaces functional interfaces and OnClickListener is an example:
// A functional interface has exactly one method
public interface OnClickListener {
    void onClick(View view);
}
Basically the lambda consists out of a three parts:
button.setOnClickListener((view) -> {doSomething()});
- declaration of all method arguments between brackets
() - an arrow
-> - code that needs to execute between brackets
{}
Note that in many cases even the brackets () and {} can be removed. For more details have a look at the official documentation.
Method references#
Recall that lambda expressions remove a lot of boilerplate code for functional interfaces. Method references take that concept one step further when the lambda calls a method that already has a name.
In the following example:
button.setOnClickListener(view -> doSomething(view));
All the lambda does is redirecting the work to an existing doSomething() method. In such a case, a method reference simplifies things further to:
button.setOnClickListener(this::doSomething);
Note that the referenced method must take exactly the same parameters as the functional interface:
// functional interface
public interface OnClickListener {
    void onClick(View view);
}

// referenced method: must take View as argument, because onClick() does
private void doSomething(View view) {
    // do something here
}
So how do method references work?
They are again syntactic sugar to simplify a lambda expression that invokes an existing method. They can reference to:
| static methods | MyClass::doSomething | | instance method of object | myObject::doSomething | | constructor | MyClass:: new | | instance method of any argument type | String::compare |
For more examples about this have a look at the official documentation.
Default interface Methods#
Default methods make it possible to add new methods to an interface without breaking all classes that implement that interface.
Imagine if you have a MyView interface that is implemented by a MyFragment (typical MVP scenario):
public interface MyView {
    void showProgressbar();
}

public class MyFragment implements MyView {

    @Override
    public void showProgressbar() {

    }
}
When you now want to add an extra method to MyView your code will no longer compile, until MyFragment also implements that new method. This is annoying, and can be even problematic when many classes are implementing said interface.
Therefore Java 8 now allows you to define default methods that provide a standard implementation:
public interface MyView {
    void showProgressbar();
    default void hideProgressbar() {
        // do something here
    }
}
So how do default methods work?
Just define a method with the default keyword in the interface and provide an actual default method body.
To learn more about this feature, have a look at the official documentation.
How to get started#
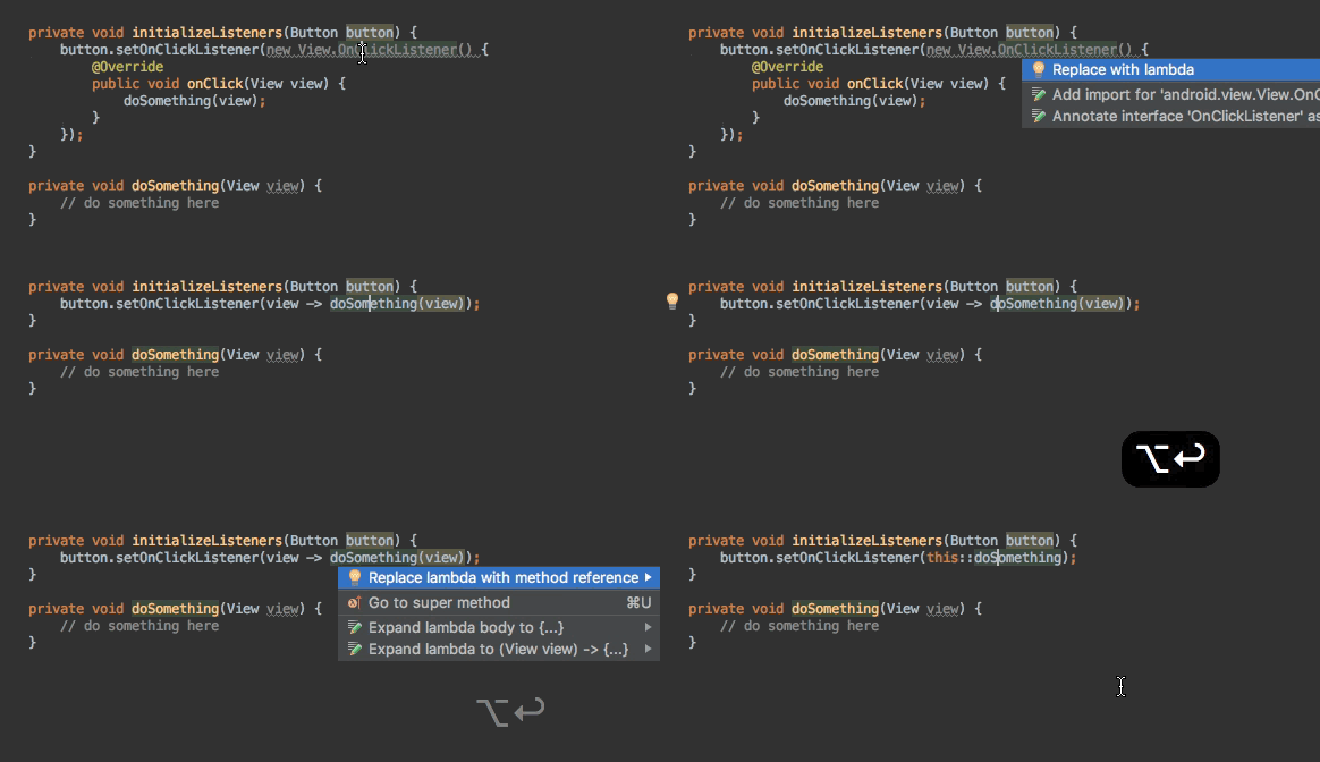
While this all might seem a bit overwhelming, Android Studio actually offers amazing quick fixes once you enable Java 8 features.
Just use alt/option + enter to convert a functional interface to a lamba or a lambda to a method reference.

This is a great way to get familiar with these new features and allows you to write code like you’re used to. After enough quick fixes by Android Studio you’ll learn in what cases a lambda or method reference would be possible and start writing them yourself.
Supported features#
While not all Java 8 features have been backported yet, Android Studio 3.0 offers plenty more features:
- static interface methods
- type annotations
- repeating annotations
- try with resources (all versions, no longer min SDK 19)
- Java 8 APIs (e.g. stream) -> min SDK 24
Wrap-up#
Thanks to Java 8 features, a lot of code can be simplified into lambda’s or method references. Android Studio auto convert is the easiest way to start learning these features.
If you’ve made it this far you should probably follow me on Mastodon. Feel free leave a comment below!
