Wrapping up this series on modularization I’d like to share some of the things we’ve learned at Philips Hue while going through this process the past year.
Part five of this series will share quite a few useful tips and tricks for modularizing apps.
Configuring modules#
In order to drive modularization it’s very important to make creating a new module as simple as possible:
- adding a new module must be easy (so it will happen often)
- maintaining module configurations must be easy
Both of these can be accomplished via a nice little trick in the project level build.gradle file (thanks to Olivier Patry for the simplification):
subprojects {
    afterEvaluate { project ->
        if (project.hasProperty('android')) {
            android {
                buildToolsVersion Config.buildTools
                compileSdkVersion Config.compileSdk

                defaultConfig {
                    minSdkVersion Config.minSdk
                    targetSdkVersion Config.targetSdk
                    testInstrumentationRunner "androidx.test.runner.AndroidJUnitRunner"
                }

                compileOptions {
                    sourceCompatibility Config.javaVersion
                    targetCompatibility Config.javaVersion
                }
            }
        }
    }
}
The block above will dynamically look for all android or android-library modules and configure the android block with all default values. That way each module will use the same minSdk, buildTools, testRunner, javaVersion,…
This won’t just avoid issues like dangerous permissions sneaking into your app, but will also make it very easy to bump the target/minimum SDK and will simplify configuring submodules to just listing the dependencies.
For instance the Login feature build.gradle is:
apply plugin: 'com.android.library'
apply plugin: 'kotlin-android-extensions'
apply plugin: 'kotlin-android'

dependencies {
    implementation project(':libraries:ui-components')
    implementation project(':libraries:actions')

    implementation Deps.androidx_material
    implementation Deps.androidx_constraintlayout
    implementation Deps.androidx_navigation_fragment
    implementation Deps.androidx_navigation_ui

    testImplementation Deps.testlib_junit

    androidTestImplementation Deps.testandroidx_runner
    androidTestImplementation Deps.testandroidx_rules
    androidTestImplementation Deps.testandroidx_espressocore
}
No more android{} block required! Also, note that there is no need to specify a release or debug build type block.
Module graph#
While modularizing it’s great to keep an eye on the dependencies between different modules. For this, Jake Wharton made a little script that creates a visual overview of your modules.
To use it, I recommend downloading the script and adding it to your repository. But you could also simply add the following to your app build.gradle file:
apply from: 'https://raw.githubusercontent.com/JakeWharton/SdkSearch/master/gradle/projectDependencyGraph.gradle'
Then you can simply run ./gradlew projectDependencyGraph to get a graphical overview.
> Task :app:projectDependencyGraph
Project module dependency graph created at ~/ModularizationExample/build/reports/dependency-graph/project.dot.png
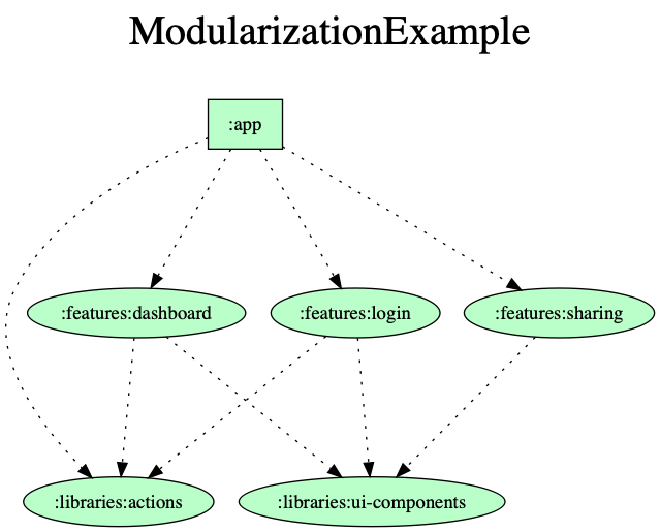
Android modules are shown in green, Java modules in pink and Kotlin multiplatform modules in orange.
Organize settings.gradle#
When adding a new module via Android Studio, by default a new entry is added to the settings.gradle file. This is necessary to inform Gradle that this module will also participate in the build.
By default each new module is added to the same line:
include ':app', ':features:login', ':features:dashboard', ':features:sharing', ':libraries:ui-components', ':libraries:actions'
However, you can also configure each module on it’s own line:
include ':app'
include ':features:login'
include ':features:dashboard'
include ':features:sharing'
include ':libraries:ui-components'
include ':libraries:actions'
This keeps the settings.gradle file cleaner and easier to read. But it also avoids clutter in your Git history, because adding a new module will now add a new line instead of modifying an already existing (very long) file at some random place.
Note: I’ve created a feature request for this and this will now be the default behavior from Android Studio 3.6 onwards!
Module internals#
Project organization#
When you scale up the number of modules, your root git folder might become quite messy. One convenient way to organize it is to create three different top-level folders: app, features and libraries. This will naturally organize all the modules that you have:
.
├── app
├── features
│   ├── dashboard
│   ├── login
│   └── sharing
└── libraries
    ├── actions
    └── ui-components
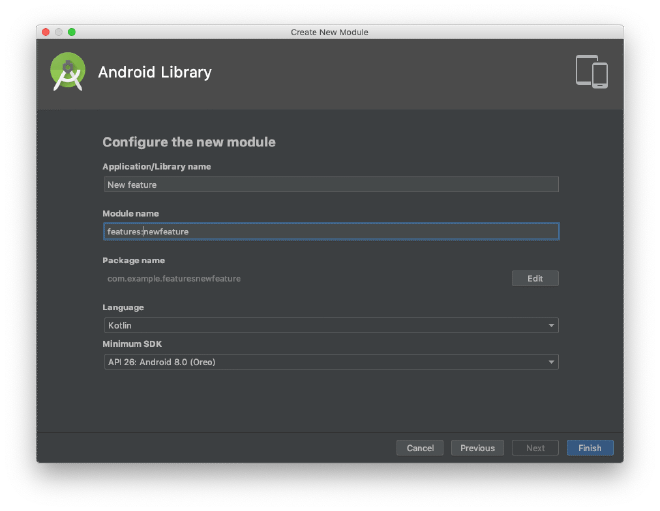
In order to directly generate a module in one of the subfolders, go to File > New > New Module in Android studio and prefix the module name with features: to directly create the module in the features folder.
Alternatively, you can also create the new module, and drag it to the correct subfolder. In that case, just make sure to also update the module reference in settings.gradle after you do that.
include ':app'
include ':features:newfeature'
Finally, every module should have a README.md file at its root level explaining in a concise one-liner what that module is supposed to do. That makes navigating the code online (e.g. Github) a breeze.
Package names#
While the main app package name is rather long (com.jeroenmols.modularization.example), the modules follow a very simple pattern:
- features: [project-name].features.[feature-name]
e.g.modularization.features.login - libraries: [project-name].libraries.[library-name]
e.g.modularization.libraries.actions
This doesn’t just avoid getting very long package names, but it will also logically group your imports in your code:
- all your modules are grouped due to the same project name
- feature imports appear first, followed by library imports
Layout previews#
When looking at the layout preview of any layout resource in a submodule, it is shown by default in the wrong theme:
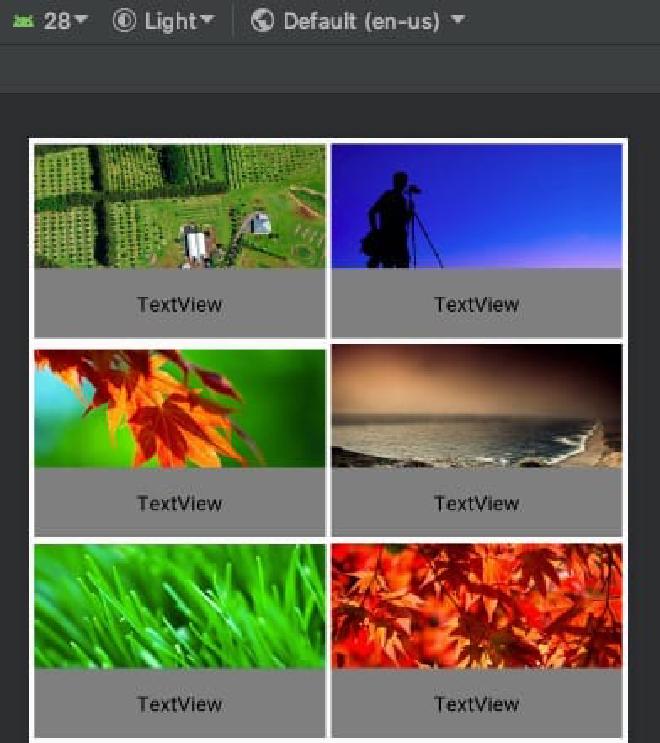
This makes sense, as our submodules don’t know anything about the application theme set in the main app module manifest.
While you can manually change the theme from the drop-down menu, you can also tell the module what theme it will eventually inherit from the app module. Do this by adding the theme attribute to the application element of the submodule manifest:
<manifest xmlns:android="http://schemas.android.com/apk/res/android"
    package="modularization.features.dashboard">

    <application android:theme="@style/AppTheme">
        <activity android:name=".DashboardActivity" />
    </application>

</manifest>
That way the layout previews will be shown in the correct theme by default!

Restrict visibility#
In order to ensure different modules are properly decoupled, I highly recommend marking each class with an internal modifier unless it is part of the public API.
This has the added advantage that Android Studio autocomplete will suggest fewer options (only the relevant ones), making it easier to find the classes you need while coding.
Dependency management#
When scaling up your project to a lot of modules, making sure that every module uses the same version of each dependency can be quite a challenge. Hence I advice to centrally manage the version of each dependency so it can be updated for all modules with just one change.
There are many different ways in order to accomplish that, so I encourage you to check out Sam Edward’s great article on dependency management. Adopting this into the ModularizationExample leads to a very simple dependencies file listing all dependencies:
import org.gradle.api.JavaVersion

object Config {
    val minSdk = 23
    val compileSdk = 28
    val targetSdk = 28
    val javaVersion = JavaVersion.VERSION_1_8
    val buildTools = "28.0.3"
}

object Versions {
    // <editor-fold desc="google">
    val androidx_core = "1.0.1"
    val androidx_recyclerview = "1.0.0"
    val androidx_navigation = "2.0.0"
    val androidx_constraintLayout = "1.1.3"
    val material = "1.1.0-alpha04"
    // </editor-fold>

    ...
}

object Deps {
    val androidx_core = "androidx.core:core-ktx:${Versions.androidx_core}"
    val androidx_constraintlayout = "androidx.constraintlayout:constraintlayout:${Versions.androidx_constraintLayout}"
    val androidx_material = "com.google.android.material:material:${Versions.material}"
    val androidx_navigation_fragment = "androidx.navigation:navigation-fragment-ktx:${Versions.androidx_navigation}"
    val androidx_navigation_ui = "androidx.navigation:navigation-ui-ktx:${Versions.androidx_navigation}"
    val androidx_recyclerview = "androidx.recyclerview:recyclerview:${Versions.androidx_recyclerview}"

    ...
}
Also, when projects grow bigger, the number of dependencies will also grow causing it hard to keep all of them up to date. Fortunately, Ben Manes has created a Gradle Versions Plugin that makes it very easy to keep your dependencies up to date.
Simply add the plugin and run:
./gradlew dependencyUpdates
To get a clear output of all up to date and out of date dependencies:
------------------------------------------------------------
: Project Dependency Updates (report to plain text file)
------------------------------------------------------------

The following dependencies are using the latest milestone version:
 - com.github.ben-manes:gradle-versions-plugin:0.21.0

The following dependencies have later milestone versions:
 - androidx.constraintlayout:constraintlayout [1.1.3 -> 2.0.0-beta1]
     http://tools.android.com
 - androidx.core:core-ktx [1.0.1 -> 1.2.0-alpha01]
     http://developer.android.com/tools/extras/support-library.html
 - androidx.navigation:navigation-fragment-ktx [2.0.0 -> 2.1.0-alpha04]
     https://developer.android.com/topic/libraries/architecture/index.html
 - androidx.navigation:navigation-ui-ktx [2.0.0 -> 2.1.0-alpha04]
     https://developer.android.com/topic/libraries/architecture/index.html
 - org.jetbrains.kotlin:kotlin-android-extensions [1.3.20 -> 1.3.31]
     https://kotlinlang.org/
 - org.jetbrains.kotlin:kotlin-android-extensions-runtime [1.3.20 -> 1.3.31]
     https://kotlinlang.org/
 - org.jetbrains.kotlin:kotlin-gradle-plugin [1.3.20 -> 1.3.31]
     https://kotlinlang.org/

...
Speed up builds#
Remember that speeding up builds was an important reason to modularize apps. One of the most intriguing ways Gradle accomplishes this is by being smart about whether a code change will also require other modules to be recompiled.
While you can find the full explanation here, it suffices to say here that you should always strive to implementation dependencies instead of api.
dependencies {
    // Don't do this
    api project(':libraries:ui-components')

    // Do this instead
    implementation project(':libraries:ui-components')
}
Wrap-up#
Modularization yields tons of benefits, yet can be quite challenging.
After reading this series, you’ve learned why modularization is important, what the architecture of a modularized app could be, how to start modularizing your app and finally quite some useful tips and tricks to help you along the way.
If you’ve made it this far you should probably follow me on Mastodon. Feel free leave a comment below!